.svg)
.svg)
.svg)
.svg)
.svg)
.svg)
.svg)
.svg)
.svg)
.svg)
.svg)
.svg)
.svg)
.svg)
.svg)
.svg)
.svg)
.svg)
.svg)
.svg)
.svg)

Every Paubox account comes with a free Secure Contact Form, valued at $1,188 per year.* It’s an easy way for your clients and patients to send you files (ex. signed pdfs, images, documents, etc.) that are encrypted and secure.
SEE ALSO: 3 mind-blowing ways to save money with Paubox
How it works
You can link to your unique contact form URL on your website or send the URL to patients directly so they can securely upload sensitive files and forms and be HIPAA compliant.
Form submissions go straight to your inbox to easily get added to your workflow.
The contact form link is hosted on our encrypted Paubox server, so you don’t need to worry about having a HIPAA compliant website.
Setting up your Secure Contact Form
Here's how to configure your Paubox Secure Contact Form.
- Log into your Paubox Admin Panel
- On the left-hand navigation in the Paubox Admin Panel, click on Overview.
- Under Secure Form Settings, click on the Edit button.
- Edit the Secure Contact Form Name. Choose a name for your form (most customers will use their company name or website domain). This name will appear in the URL of your form link. Note, changing the name will change your unique URL, be sure to update any links on your website with the new URL.
- Add Recipient(s). These are the email addresses that will receive forms when they’re submitted. Include multiple email addresses, separated by commas.
- Add a Logo URL. This is where someone will be directed if they click on your logo on the contact form.
- Upload a Logo. This logo will appear at the top of your secure contact form for a branded look.
Here's an example of what your Secure Contact Form will look like:
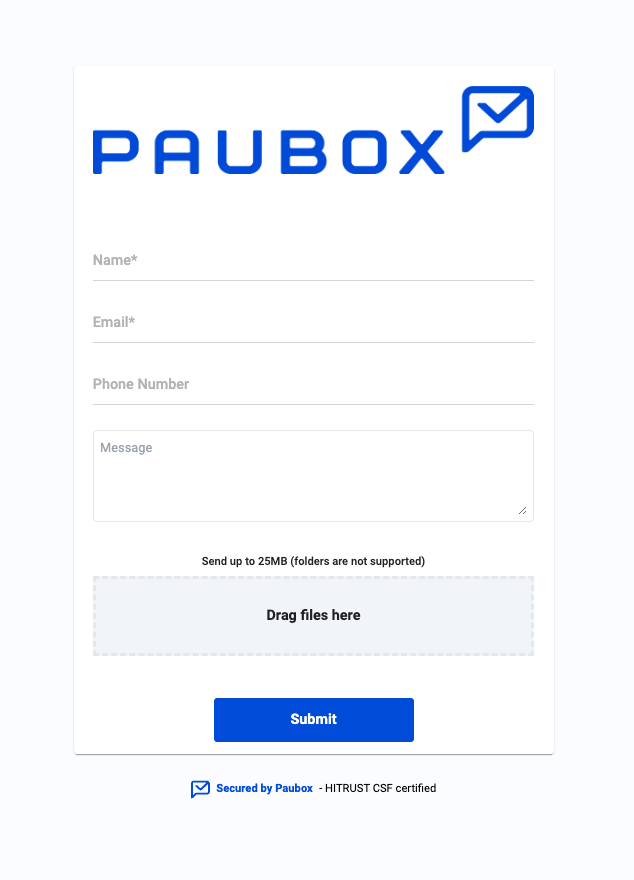
The form will require the submitter to include a name and email address. Optionally, they can add a phone number, message and upload files.
Most common file types are supported except for folders. Multiple files can be sent at once, as long as it does not exceed 25 megabytes.
Paubox customers enjoy saving the extra costs a HIPAA compliant contact form would require, while also giving their patients an easy way to send documents, such as patient intake forms.
*$1,188 per year value based on comparison to similar products that are HIPAA compliant.